 HONKIP
Your home name.
Your home apps.
Keep your home name up to date. With Connect, reach the home apps you choose while you’re away, even when your provider shares one internet address between many homes. No router ports to open. You choose who can visit.
Before you start: make a free account and choose your home name, then install this on a Windows PC that stays on at home.
Download for Windows · 1.4.10Windows 10 or 11, 64-bit. Includes the IP updater and Connect.
The IP updater is included on every plan. Connect is included with Pro. Check your Connect access.
Using Linux?
Set up IP updates, Connect services and the optional browser-terminal add-on through a guided console menu.
See the real Windows app
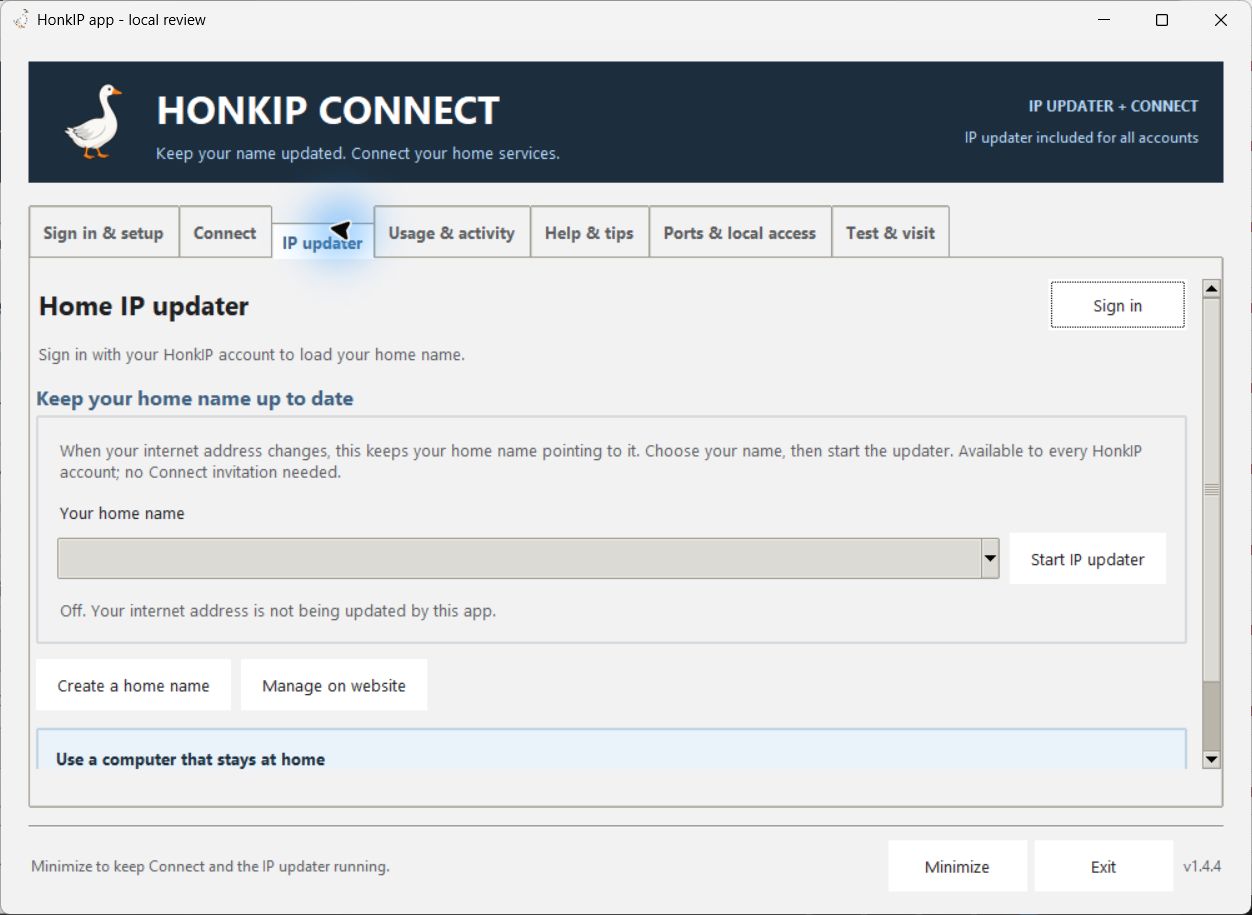
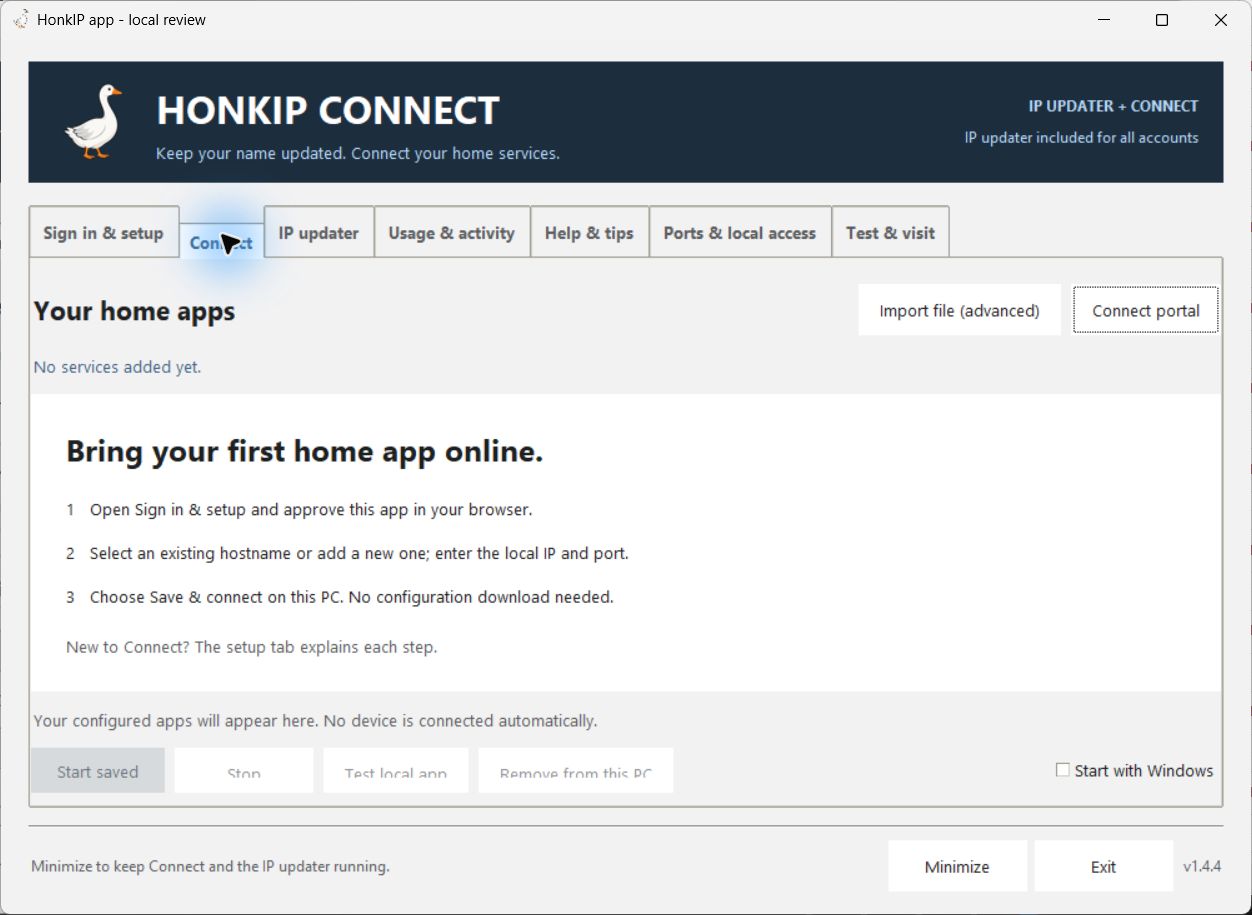
One app, two jobs: IP updater keeps your home name current; Connect reaches your chosen services. These screenshots show the app signed out, before any services are added.
Start with one app
- Install and sign in.Open the Windows download. Choose Sign in and approve the code on the HonkIP website.
- Choose a name and test.Pick an existing service name, or add one under a name or domain you own. Paste the local app address. Choose Test local app, then Save & connect on this PC.
- Open it, then share if you want.Leave it Private for your first try. Open it through the Connect portal. Change who can visit when you are ready.
Windows setup, step by step
Download HonkIP Connect for Windows
- Download and open HonkIPConnect.exe. If your browser says the file is not commonly downloaded, choose Keep. If Windows says Windows protected your PC, choose More info. Check the app is HonkIPConnect.exe, then choose Run anyway. It installs for your Windows user and adds a Start menu shortcut. You do not need administrator access or a separate Python installation.
- In Sign in & setup, select Sign in. The approval page opens with your code filled in. Check that it matches the app, then approve. You can also use Copy code and Open sign-in page. If the website asks you to sign in first, it returns you to approval afterwards. Approve only a code from your own computer. The app shows the remaining time and has Cancel sign-in. Once approved, it opens Your services.
- Open Sign in & setup to add a service. If you need a home name, choose Create a home name in the app. Pick its name and ending; it appears in your app and on the website. Then select an existing service hostname, or choose a domain from your account and enter a short app name such as files. The app shows the full address. Only your active home names and verified domains are offered. Add and verify a missing domain first. Paste the local HTTP/HTTPS address, or enter the IP, port and type. New web apps start with HTTPS on port 443. Use the actual port on your device; choose HTTP explicitly only if your device requires it. Select Test local app, then Save & connect on this PC. For a device with its own certificate, see certificate setup.
- If you use your own domain, add the DNS records shown and select Check ownership. Keep the TXT record. A new name below your HonkIP home is checked automatically.
- For a service you already saved on the website, select Refresh account, choose it, then Move / set up on this PC. Confirm that this replaces any previous computer's connection. No JSON download is needed. For normal reconnection on this PC, Start saved connection keeps its saved credential. PC connected confirms the link to HonkIP; use Test local app to check the home device. Allow a little time for the first public HTTPS certificate.
- Under Who can visit, choose private, open or password access, then save it. For private services, Open in Connect portal selects that service; choose Open service there. For open/password services, use Open address. Keep the app running. Minimize keeps it connected; Exit stops this PC's services.
Optional: select Start with Windows to launch minimized after you sign in. Services you started reconnect automatically when the app opens. A service you stopped stays stopped. The app supports up to five saved services.
Use the same app as your IP updater
Open the IP updater tab, select your existing home name and press Start IP updater. Its status and stop button stay together in this tab. It checks IPv4 and IPv6 every five minutes; a network without IPv6 can still update IPv4. Run it on a PC that stays at home. Stop the old updater for this name to prevent conflicting updates. Connect service hostnames keep their Connect addresses when your home IP changes.
Sign-in and saved service credentials are protected with your Windows account. Your password stays on the website. The app stays signed in while it runs, also after you sign out of the website. Its access ends when you revoke the app, change your password or choose Sign out everywhere else on your account page, or when the app does not run for 90 days. If this happens, choose Sign in again and set up the service again. Refresh account loads website changes and keeps your unfinished edits. After an app change, refresh the website to see it there. Sign out stops the updater and removes this account's saved connection credentials on this PC, even offline. If online revocation cannot complete, the app tells you to revoke the approved app when online. Closing stops both features; minimizing keeps them running.
Moving an existing service hostname to Connect replaces its direct address. It starts private, and you can change who can visit. Your main home name stays with the IP updater. Removing the Connect service restores the existing name's home address when you still have access to that domain. The picker lists available home-following service names on your HonkIP home or verified domains managed by HonkIP. New names on your own domains still need the displayed Connect DNS records.
The Windows download is not signed yet, so Windows may warn you before it opens. Step 1 above shows how to continue. Download only from this HonkIP page. The SHA-256 checksums identify this exact release. Third-party software notices are included with the app.
Update or remove the Windows app
The app checks for new versions automatically. Use Check for updates to check now. Updates download only after you approve, and their size and SHA-256 hash are checked before opening the installer. You can also open the latest Windows download and confirm Update and restart. Confirm Stop and close in the running app if asked. Connections pause briefly; saved services and sign-in stay protected. Opening the installed Start menu shortcut again brings the running window forward.
To remove it, open Windows Settings → Apps → Installed apps → HonkIP Connect → Uninstall (Apps & features on Windows 10). Confirm removal and close the running app if asked. This removes the app, startup entry and saved settings from this PC; backups and unrelated files stay. Revoke the approved app and pause or remove services on HonkIP to revoke online access too.
Choose who can visit
Your app sign-in manages your HonkIP account. Visitor access is a separate setting for each connected service:
- Private — only me: sign in to HonkIP and use Open service in the Connect portal for web apps. For TCP/UDP, use the desktop app’s Test & visit tab.
- Open — anyone with the address: visitors open the HTTPS address for a web app, or use the assigned hostname and port for TCP/UDP. HonkIP does not ask them to sign in.
- Password — people I share it with: for web apps, set a shared password of 12–128 characters. Visitors need that password, but no HonkIP account. Use a different password from your account password.
Check your home app’s login before sharing. It sees the connection as coming from your Connect PC. Some apps trust home-network clients and skip their own login. Keep web apps Private or Password-protected until you have checked their login from outside. Keep TCP/UDP services Private until their own sign-in has been checked. Changing access or its password signs out visitors; active connections close when the next access check completes.
Pause service stops access through HonkIP until you enable it again, including private visiting access. Stop stops only the connector on this PC. Open address opens an open/password web service; Open in Connect portal selects your private web service. These controls do not change your router or stop the home app itself.
Usage and activity
The Windows app's Usage & activity tab shows your monthly total, remaining allowance, next reset and limits. It refreshes about once a minute while you are signed in. The allowance resets on the first of each month at 00:00 UTC; the app also shows that time in your local time. The Connect portal shows the same monthly allowance; use Refresh status for the latest figures.
The app's activity log lists connection, local-test and updater events for the current app session. It stays in memory on this PC and clears when the app closes. It does not record visitors' pages, passwords or app content.
macOS or NAS · advanced setup
On Linux, use the guided Linux installer instead.
Download the connector package. Use Python 3.12 or newer on a device that supports Python virtual environments. This is the command-line option; the Windows app is the packaged desktop download.
- Extract the package into a folder owned by your user.
- Add and verify the service in Connect settings, then download its configuration into that folder as
honkip-connect.json. - Open a terminal in that folder and run:
python3 -m venv .venv
.venv/bin/python -m pip install -r connect_service/requirements.txt
chmod 600 honkip-connect.json
.venv/bin/python -m connect_service.connector --config honkip-connect.json
Select Enable service in the Connect portal and choose who can visit. Use Open service for private access or Open address for open/password access. Keep the command running. Press Ctrl+C to stop it. For another service, use a different configuration filename and a separate process.
For automatic startup, use your device's startup or service manager with the full path to the virtual environment's Python and the configuration file. Run it under your own user with access to that file. Do not put the credential itself into a startup command. The package includes a Linux user-service example and instructions.
Try a temporary test page
Do not have a home app ready yet? This creates a small test service to check the connection. Use a separate test name so your real services keep their settings.
Start and stop a test safely
- Choose Add a new hostname for a separate test service. In Test & visit, choose HTTP for a test web page, TCP or UDP for a connection test, and a free local test port. Select Start test server.
- Return to setup. The local settings are filled in. Choose the test hostname and Save & connect.
- For the web page, turn off Wi-Fi on your phone and use mobile data. New services are Private: sign in to the Connect portal on the phone and choose Open service. If you deliberately chose Open or Password access, open the HTTPS address instead. Compare the code and press the page’s confirmation button.
- For TCP/UDP, use the public check for an Open service, or sign in on a second Windows PC and use Check visiting test server. Compare the returned code with the home PC.
- Stop test server when finished. It also stops after ten minutes, on sign-out or on exit. Temporary test connections never start automatically. Pause or remove the temporary service afterwards.
The test server serves no files. Local checks and confirmation clicks cannot prove the visitor used a separate internet connection; the app labels the path actually checked.
Ports & local access
No inbound router ports need opening for HonkIP Connect. Choose the port your home service already uses. The Windows app includes this guide in its Ports & local access tab.
Find a running app or choose a preset
App running on this PC? In Sign in & setup, choose Find running apps on this PC, select the app, then Use selected app. This fills in its local address, port and a suggested connection type. Check the type against the app’s settings. Use Test local app for a web app before saving; check Remote Desktop, SSH and games with their own client.
This reads the apps already accepting connections on this PC, including TCP and UDP. It does not scan other devices, change firewall rules or share an app online. You can find apps before signing in; connecting them still needs an account with Connect access. For an app on another device, enter its local IP and port yourself.
In the desktop app, choose a preset and press Use preset, or enter your own local port and HTTP, HTTPS, TCP or UDP. Choose Find this PC’s adapters to list its active Wi-Fi, Ethernet and private adapter addresses. For an app running on another device, enter that device’s IP manually. We do not scan your network or change firewall rules.
Paid plans with spare hostname slots can create a name directly under honkip.com. You can also use a name below your home name or a verified domain. Both the website and app enforce your plan and account ownership.
Remote Desktop, SSH and games
These services use TCP or UDP instead of a web page. Select the matching preset, or use the connection type and port given by the service’s own instructions. Opening their address in a browser will not start them.
Private — just you: install HonkIP Connect on the Windows PC you are visiting from and sign in to the same HonkIP account. Open Test & visit, select the service and start visiting access. Copy the displayed local address into your Remote Desktop, SSH or game app. Keep Connect running on both PCs. Visiting access stops when you exit or sign out.
Open — other people can connect: explicitly choose Open access. Connect assigns an internet port, which can differ from the service’s local port. Give visitors the displayed hostname and port to use in their service’s app; they do not need HonkIP Connect. A shared HonkIP password cannot protect TCP/UDP services, so keep the service’s own login and encryption enabled. Direct public traffic is encrypted only if the service itself uses encryption; the home connector and signed-in visiting connection use HTTPS.
Find and test the local address and port
In http://192.168.1.50:8080, 192.168.1.50 is the device, 8080 is the port and the type is HTTP. This is an example. Find the actual address in your app or device settings. HTTP normally uses port 80 and HTTPS port 443 when the address has no explicit port.
- Open that local address in a browser on the computer running Connect. Use
127.0.0.1only when the home app runs on that same computer; use the other device's local IP otherwise. - If it fails, check the app is running, the port and HTTP/HTTPS choice are right, and another device's app accepts LAN connections rather than only localhost. Guest Wi-Fi isolation may block access between devices.
- If a device firewall blocks it, allow the home app on the device hosting it, scoped to the Connect computer. Selecting a port in HonkIP does not start a listener or alter a firewall.
- Paste the local address or enter its IP, port and type in Sign in & setup. Use Test local app, then Save & connect on this PC. For a service saved on this PC, Start saved connection reconnects it; changing device settings offers Save & reconnect. Manual JSON import remains available for advanced setup and the command-line connector.
Keep the device’s local address from changing. Your router may call this an address reservation or DHCP reservation. For a private web app, choose Open service on HonkIP; its internet address uses HTTPS, even when its local address uses HTTP or a different port.
If a device firewall blocks the local app · advanced help
On the computer hosting the home app, use Windows Security → Firewall & network protection → Allow an app through firewall → Change settings. Allow that app on your trusted Private network. Keep the firewall enabled. HonkIP Connect itself does not need an inbound allowance. Official Microsoft firewall instructions.
If the home app requires an explicit port rule, an administrator can use Advanced settings → Inbound Rules → New Rule → Custom. Select the app's program where possible, TCP or UDP to match the service, and its exact local port. Restrict the remote addresses under Scope to the Connect PC's local IP, allow the connection and select Private only. Name the rule so you can disable or remove it when no longer needed. Use the device maker's equivalent instructions for a NAS or Linux host. Official Microsoft port-rule instructions.
Router and game compatibility · advanced details
Connect uses outbound HTTPS on TCP 443. If outgoing traffic is restricted, ask the network administrator to allow that connection to HonkIP. Do not add router port-forwarding, DMZ or UPnP rules for Connect. Connect handles HTTP/HTTPS, WebSockets and individual TCP/UDP ports. Use a preset for Remote Desktop, SSH or Minecraft, or choose a custom port. Presets do not install those services. UDP packets can be up to 32 KB. A quiet UDP session closes after 30 seconds and opens again with the next packet. To stop misuse, public UDP replies can be at most four times the data that came in, or 64 bytes if that is more. UDP travels inside the encrypted connection. Games that need LAN discovery, several ports or very low delay may need extra setup, or may not work.
If it does not connect
- Waiting for service or internet: check the device's internet connection, the service's Enabled status and your monthly allowance. The app retries automatically.
- Settings changed: select the service in the app, change its device settings, then choose Save & reconnect. If settings were changed on the website, refresh the account and use Move / set up on this PC. Manual and command-line users should download a fresh configuration instead.
- PC connected but the app does not open: this means your PC reached HonkIP, not that the home app is ready. For a web app, use Test local app, then open it through the portal. The local test checks that the device answers; it does not prove every page works. For TCP, it checks whether the local port accepts a connection. For UDP, test with the game or service’s own app. Keep the home device awake.
- Your own hostname: leave its TXT proof in place, point its address at the assigned relay and remove conflicting address records, then check ownership again.
- HTTPS or certificate error: first check that HTTP/HTTPS and the port match the address that works at home. If your home device uses its own certificate, follow the certificate help below. Do not change HTTPS to HTTP just to hide a certificate error.
- Sign-in expired: choose Sign in again and approve the new code. Then set up the service on this PC again. You do not need to discover a separate sign-out step.
- Connection access expired after using another computer: select the service in Sign in & setup and choose Move / replace connection. Confirm only when you intend to run it here: this creates a fresh credential and disconnects any other computer running that service.
Set up HTTPS and a device certificate
Your public web address is automatic. HonkIP arranges its HTTPS certificate after the name and connection are ready. Allow a little time on the first visit. You do not buy or install that certificate yourself.
Your home device is a separate connection. New web apps start with HTTPS and certificate checks on. If the device already has a valid certificate trusted by Windows and matching its local IP, no extra setup is needed.
- Enter the device’s local IP, HTTPS and its actual port.
- If it uses its own certificate, select Use this device’s certificate. The app reads the public certificate from that address.
- Check the displayed name, expiry date and fingerprint against the device’s settings or ask its administrator to confirm them. Approve only a certificate belonging to your device.
- Use Test local app, then save and reconnect.
Connect saves the approved certificate for this service on this PC. It does not change Windows trust for other apps, and certificate checks remain on. A changed or expired certificate needs your attention; it is not silently accepted.
Have a certificate file already? Under Show manual certificate settings, enter the Name on the certificate first if it differs from the IP. Choose Import file and select the trusted PEM file supplied by the device’s administrator, then review and confirm it. Never use or share a private key. Command-line users can set ca_file and server_name in their private configuration.
Does the device only support HTTP? Connect cannot install an HTTPS server or certificate on a NAS, router or other device automatically. Enable HTTPS using that device’s own settings, or explicitly choose HTTP in Connect. With HTTP, the last connection from this PC to the device is unencrypted; the public web link still uses HTTPS. Ask for help if you are unsure.
Connect shares 100 GB per calendar month (UTC) across all your services. That is an account allowance, not an allowance for each app. Uploads and downloads both count; reaching it pauses Connect until the next monthly reset. Speed is shared and best effort; see the Fair use policy. Traffic for these apps passes through HonkIP; ordinary browsing does not. Your normal home names and IP updater continue working if Connect stops.
Downloaded configuration files contain a credential. Keep them private, or delete them after importing into the Windows app. Downloading a new configuration replaces the old credential. The combined Windows app includes the IP updater; stop your old updater before enabling the same home name here.